Professional pressure washing services and more across Long Island.
Contact Info
- Roslyn Heights, NY 11577
- Call: 516-353-8711
- Text: 516-353-8711
- 24/7 - 365 Days
Professional pressure washing services and more across Long Island.
Contact Info
Your pavers face Long Island's toughest conditions. Here's how cleaning, sanding, and breathable sealing protects them from weeds, fading, and freeze damage.
Paver cleaning and sealing isn’t about making your outdoor spaces look pretty for a few weeks. It’s about creating a protective barrier that prevents the kind of damage that leads to expensive repairs or full replacement.
The process involves three critical steps: deep cleaning to remove years of dirt and grime, replacing or stabilizing the joint sand between pavers, and applying a breathable sealer that protects without trapping moisture. Each step serves a specific purpose, and skipping any of them compromises the results.
Think of it like this. Your pavers are porous, which means they absorb everything: water, oil, dirt, organic matter. Once that stuff gets in, it’s nearly impossible to remove. Sealing creates a barrier that keeps contaminants on the surface where you can actually clean them off. The joint sand replacement stabilizes your pavers and prevents weeds from taking root. And the cleaning removes all the buildup that’s already there so you’re starting fresh.

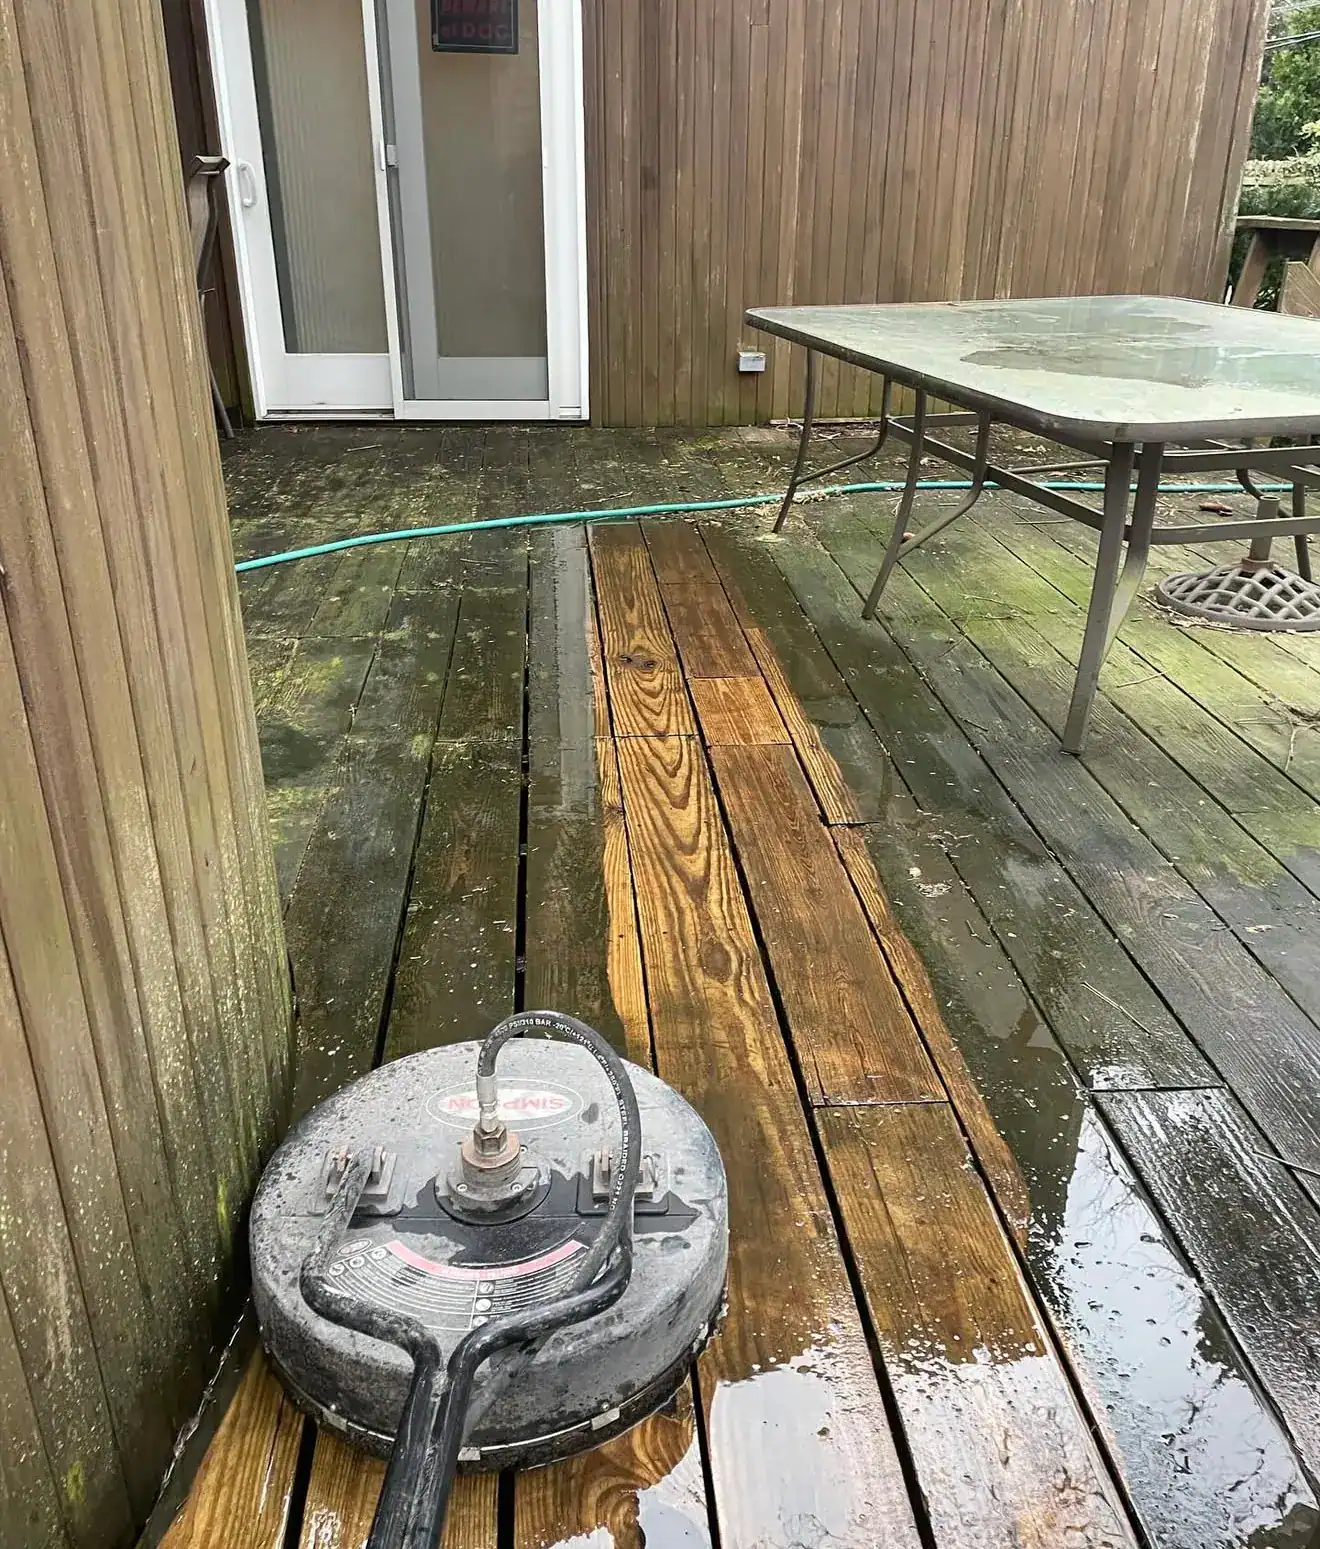
Professional paver cleaning uses hot water pressure washing to reach deep into the pores of your pavers. This isn’t the same as hosing them down or using a basic pressure washer from the hardware store. Hot water breaks down oil-based stains, lifts embedded dirt, and removes organic growth like algae and moss that regular cleaning can’t touch.
The pressure needs to be calibrated correctly. Too much pressure and you’ll damage the paver surface or blow out all your joint sand, creating more problems than you solve. Too little and you’re just moving surface dirt around without actually cleaning anything. Professional equipment allows for the right balance, removing contaminants without causing damage.
This step also reveals the true condition of your pavers. Stains you thought were permanent often come out with proper cleaning. Colors you assumed had faded forever can be restored. And you get a clear picture of whether you need any repairs before sealing, like replacing cracked pavers or addressing drainage issues that might be causing problems.
For Long Island homes, this cleaning step is especially important because of what your pavers are exposed to. Salt from winter de-icing. Coastal moisture. Tree sap and organic debris. BBQ grease. All of that builds up over time, and if you seal over it, you’re locking it in permanently. The cleaning ensures you’re protecting clean pavers, not sealing in years of grime.
Once the pavers are clean and dry, you can see what you’re actually working with. That’s when the real protection begins.
The sand between your pavers isn’t decorative. It’s structural. That sand keeps your pavers locked in place, prevents them from shifting, and distributes weight evenly across the surface. When it washes out or erodes, your entire paver system becomes unstable.
Heavy rainfall in Suffolk County and Nassau County washes out regular joint sand faster than most homeowners realize. You’ll notice gaps appearing between pavers, uneven surfaces where pavers have started to shift, and weeds sprouting up in the spaces where sand used to be. Each time sand washes away, the problem gets worse.
Professional paver restoration addresses this by removing old, degraded sand and replacing it with fresh material that’s then stabilized. Some contractors use polymeric sand, which hardens when activated with water. Others use high-quality joint sand that’s then locked in place with sealer. Both approaches work when done correctly.
The key is filling those joints completely and compacting the sand properly. Loose sand will just wash out again. Improperly filled joints leave gaps where water can penetrate and cause freeze-thaw damage during Long Island winters. And if you skip this step entirely and just seal over degraded joints, you’re sealing in instability.
This is where a lot of DIY attempts fail. Homeowners buy sand from the hardware store, sweep it into the joints, and call it done. But without proper compaction and preparation, that sand will be gone after the first heavy rain. Professional equipment and technique ensure the sand actually stays where it belongs.
The joint sand replacement also plays a major role in weed prevention. Weeds don’t grow up from underneath your pavers. They grow from seeds that blow in from above and settle into the joints. When those joints are filled with loose, degraded sand, seeds find the perfect environment to germinate. When joints are properly filled and stabilized, there’s nowhere for those seeds to take root.
Want live answers?
Connect with a CPR Power Washing expert for fast, friendly support.
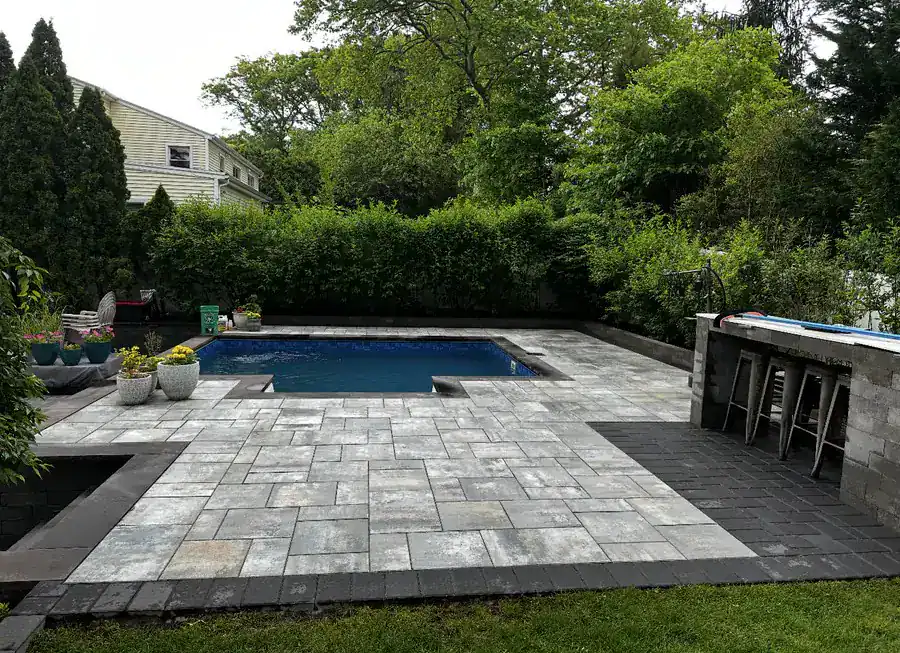
Sealing your pavers creates a protective barrier that addresses multiple threats at once. It prevents water penetration that leads to freeze-thaw damage. It blocks UV rays that cause fading. It makes your pavers resistant to stains from oil, grease, and organic matter. And it stabilizes the joint sand so it doesn’t wash away.
But not all sealers are created equal, and choosing the wrong type can actually cause problems. The most important factor for Long Island homes is breathability. A breathable sealer allows moisture vapor to escape while still protecting the surface. This prevents the hazy, cloudy appearance that happens when moisture gets trapped under the sealer.
The benefits you’ll notice immediately include restored color vibrancy and easier maintenance. Sealed pavers look richer and more saturated, almost like they’re permanently wet. Spills and dirt stay on the surface instead of soaking in, so you can clean them with a quick rinse instead of scrubbing. And the overall appearance of your outdoor space improves dramatically.

Long Island’s climate creates specific challenges that breathable sealers are designed to address. During winter, moisture that penetrates your pavers can freeze and expand, causing cracks and surface damage. During summer, intense UV exposure breaks down the colored pigments in your pavers, leading to fading. And year-round, coastal salt air accelerates deterioration.
A breathable sealer protects against all of these threats without creating new problems. The sealer creates a water-repellent surface that prevents moisture from soaking into the pavers, which stops freeze-thaw damage before it starts. It contains UV inhibitors that act like sunscreen for your pavers, preventing the sun from breaking down the color. And it creates a barrier against salt and other corrosive elements.
The breathability factor is what separates professional-grade sealers from the cheap options you’ll find at big box stores. Non-breathable sealers trap moisture that’s already in your pavers or that enters through the base layer. That trapped moisture has nowhere to go, so it creates a hazy white film called efflorescence or causes the sealer to fail prematurely.
Water-based breathable sealers are typically the best choice for Long Island conditions. They’re eco-friendly, have low odor, and can be applied the same day as cleaning once the surface is dry. They penetrate into the paver surface and the joint sand, creating protection from within rather than just forming a film on top. And they allow any moisture vapor to escape naturally.
The result is pavers that are protected from water damage, UV fading, and salt exposure while still being able to breathe. This matters especially during winter when freeze-thaw cycles are most aggressive. Sealed pavers with proper breathability can withstand dozens of freeze-thaw cycles without cracking or spalling.
You’ll also notice that sealed pavers shed water instead of absorbing it. After a rain, unsealed pavers stay dark and wet for hours or even days. Sealed pavers dry quickly because water beads up on the surface and runs off. This faster drying time reduces the opportunity for mold, algae, and moss to establish themselves.
Professional paver sealing follows a specific process that ensures proper adhesion and long-lasting protection. After cleaning and joint sand replacement, the pavers need to be completely dry before sealing begins. In warm, sunny conditions, this might take a few hours. In cooler or shaded areas, it can take up to 24 hours.
The sealer is applied evenly across the entire surface, making sure to saturate all crevices and joints. Professional applicators use commercial sprayers or rollers designed for paver work, which ensures consistent coverage without streaking or pooling. The goal is to apply enough sealer to provide protection without creating a thick film that can peel or flake.
Most quality sealers require 24 hours before light foot traffic and 48 to 72 hours before vehicle traffic. During this curing period, the sealer bonds to the paver surface and hardens the joint sand. You might notice a slight sheen or darkening of the pavers, depending on the type of sealer used. Some homeowners prefer a natural matte finish, while others like the wet-look appearance that enhances colors.
The protection lasts for two to three years on average, though this varies based on traffic, sun exposure, and weather conditions. High-traffic areas like driveways may need resealing more frequently than low-traffic walkways. Areas with heavy shade or near trees might need annual cleaning due to increased algae growth and organic debris.
You’ll know it’s time to reseal when water stops beading on the surface and starts soaking in again. You might also notice that colors aren’t as vibrant during rain, or that weeds are starting to appear in the joints again. These are signs that the sealer has worn thin and needs to be reapplied.
The investment in professional sealing pays for itself by preventing damage that would cost thousands to repair. Replacing pavers costs ten times more than maintaining them. Repairing cracks and structural damage from freeze-thaw cycles is expensive and disruptive. And once pavers have faded severely, even cleaning and sealing can’t fully restore the original color.
Regular maintenance through professional cleaning and sealing every few years keeps your pavers looking new, protects them from Long Island’s harsh conditions, and extends their lifespan by decades. It’s the difference between pavers that last 15 years before needing replacement and pavers that still look great after 30 or 40 years.
Paver cleaning and sealing isn’t optional maintenance for Long Island homes. It’s essential protection against the freeze-thaw cycles, coastal conditions, and UV exposure that damage unsealed pavers every single year. The three-step process of deep cleaning, joint sand replacement, and breathable sealing addresses the specific threats your outdoor spaces face.
The results speak for themselves: restored colors, weed prevention, easier maintenance, and protection that lasts for years. More importantly, you’re protecting the thousands of dollars you’ve invested in your patio, driveway, or walkway from damage that only gets worse over time.
If your pavers are showing signs of fading, weed growth, or sand erosion, professional cleaning and sealing can restore them before the damage becomes permanent. We serve homeowners throughout Suffolk County and Nassau County with the equipment, experience, and attention to detail that proper paver maintenance requires.
Summary:
Share: